Monday, December 31, 2012

New Ways to Nerd out your Shoes!

Happy New Year! After experimenting and studying a few more ways to tweak a standard pair of shoes, I have come across a few super awesome tutorials, and had a mini brainstorm today followed by a trip to Michael's where pretty much 1/2 the store was on sale. Needless to say I have supplies for a few projects for myself...and you all...but mostly me. I am starting a pair of Deadpool shoes because I am in love with him. Also, I have some nerd inspired room decor coming up!
Back to shoes....(can you tell I have been reading a lot of Deadpool? I start thinking in yellow boxes...) These are a few of the awesome tutorials I have been reading:
Shoe mod using mod podge, glitter, and paint techniques:
GeekFemme's Blog (Also...what an awesome get together idea!)
A glitter tutorial:
Pixie in Pumps
Adding spikes:
Spiked Shoe Tutorial

I had been trying to find a way to do comic shoes with a twist after not being able to put comics all the way up a strappy pair of heels. The flimsy straps do not provide a conducive work area, and you can't just leave a weird blank space. After seeing the glitter tutorials I had solved my problem.
The pink shoes in the picture below are the culprits. I wanted to do the base in Deadpool comic, but no way in Marvel Universe will I wear Barbie pink heels. You simply can not put Wade's comics next to pink...it's illegal. Why not cover the hideous neon pink with glitter? As long as you obey what I like to call "The Glitter Rules" you will be all set.
Everything you need is in the photo! Extra Fine Glitter, Mod Podge, Tape,  Brushes, and Sand Paper!
Glitter Rules
1. Use "Extra Fine" glitter. Do not use the large chunky piece glitter.
2. Be sure you have enough of the same color glitter for the whole job. I noticed a lot of sold out colors at Michael's and they do not restock very often :(

Mask off the areas you do NOT want glitter on with tape. This is extremely important and will save you if you get lazy like I did and glop too much on.
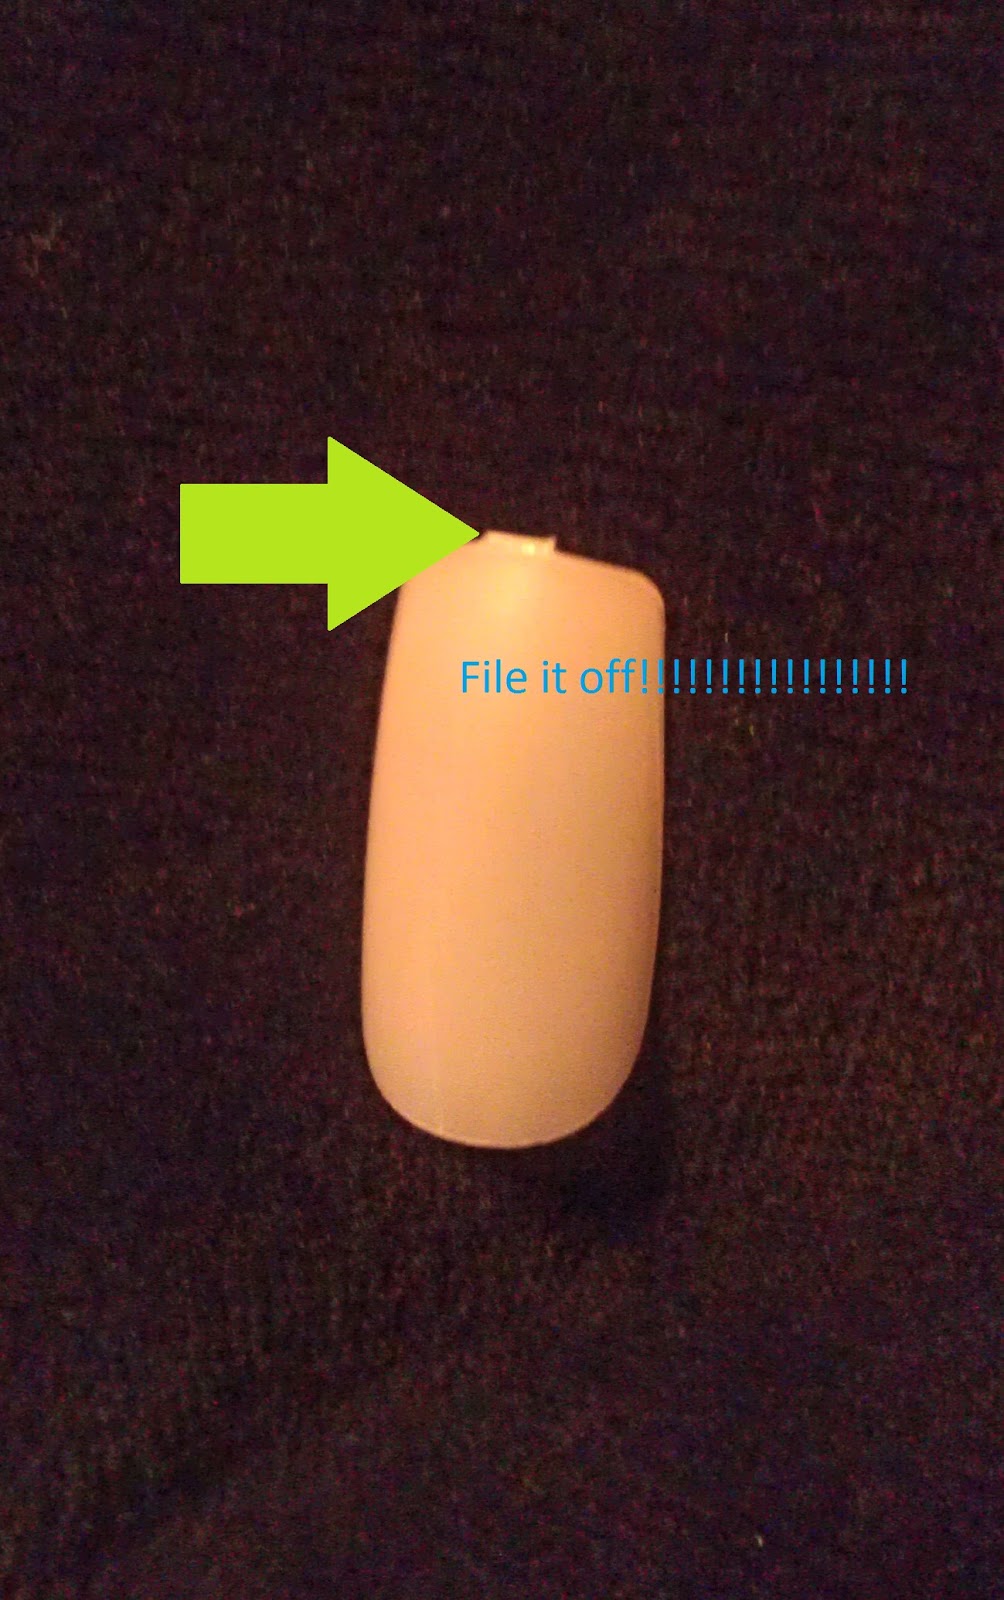
Taped off the little heel stopper and the base so no glitter gets on them.
 Why, yes! Those are my comic nails from last tutorial! Thanks for asking. What's that? Yes... Yes it did make it extremely difficult to decorate shoes.
Taped all around the heel so that only the heel will be glittered

Take sand paper and scratch up the surface you want the glitter/paste to adhere to. I found the better sanded areas worked much better, be sure to go over all the spaces you will be glittering. Wipe off any dust with a damp paper towel.
Sanding will ensure a good adhering of glitter paste
As for the actual applying glitter to the shoe.....two ways I have seen. 1. Apply an even coat of mod podge to the shoe area you wish to glitter, then sprinkle the glitter over it until it is evenly coated and let dry. To me, this seemed like a huge mess, and a potential waste of glitter, or 2. Mix glitter and mod podge and paint on the areas of the shoe you wish to glitter. The only difference being painting on the mixed glitter and mod podge can get little clumps on the surface of the shoe, so be sure to paint them smooth.
I obviously chose to paint on the glitter, so here's how I did it:
I took 1/4 cup of extra fine glitter in blue (for the blue heels you will need more if you are coating a whole pair, I used 3/4 cup glitter for the pink ones) and poured in a tablespoon of mod podge in, mixed it together with the other end of the paint brush I used, you want to make sure you have a good mix, not too runny and not too chunky.
As you can see I left a little dry glitter towards one end so I could see which consistency was better. The consistency near the paint brush is good.

Now brush it on the shoe evenly, even if you see spaces where the glitter missed, let that coat dry and go back for another coat, if you don't it ends up a tad less smooth.
Nice even coats! HINT You end up using less if you choose the same color glitter as  the shoe.
After you coat the shoe completely with as many layers as it takes to fully glitter it up, wait for it to dry, cover the rest of the shoe (even the interior) and spray the glittered area with a gloss coat, and hurry up and wait for that to dry as well.
Pre-Gloss Coat

Now you can leave the shoes as they are, you can turn them into a themed shoe....this blue one for example is a prime suspect for a Tardis or R2D2 theme, however, they will most likely become comic oriented shoes, Tutorial found here: Nerdalicious Shoes just as the pink ones will become Deadpool shoes. I will of course put pictures up of the works in progress and finished products. I have two pairs of shoes people have requested (one is Marvel...really excited!)

Thursday, December 27, 2012

Comic Nails/Contest

Hey all. Hope everyone had great holidays.
I have been waiting and waiting and waiting for my nails to grow for the nail tutorial...but when you are into crafts this much it is almost impossible. I gave up and went to Target to get myself some fake ones. This is a hard tutorial. You will need patience and nail colors galore. For some designs, you may even need art skills, but not all of them require artistic talent. I realize I don't have a design for everyone's favorite characters, but maybe you can get inspired and create your own, or share it with me and I will try to create one for you.
I am in no way ambidextrous...so I was never able to do my right hand with complicated designs, if this is you as well...do what I do...fake nails. Fake nails are so much easier to do than your own, for one...you don't have to wait for each layer to dry before using your hands, potentially chipping or smudging them. The problem with fake nails is being able to hold them while painting. I solved it for you!

What you will need:
Nail polish/paint pens
Scotch tape
Nail file
Nail polish remover
For fake nail designs you will also need:
Fake nails
Nail glue
Toothpicks

First step if you are using fake nails, pick the right sizes. If you use a nail that is too big it will rip off easily. Likewise if you use a smaller size than your nail, it will pop off. Next file off the little nub on the tip, you want to do this now so you don't have a chipped edge later...we do not want tacky edges!


Now to find a way to hold it, yet paint the entire nail...toothpick and tape. Roll a piece of tape so it is sticky on all sides, tape that to the end of a toothpick like so:

Make sure the nail won't come off while painting!
(Begin here if you're doing this on real nails!!!!!!!!!)
You're ready to put down a base coat of color on your nails. Let the base coat dry, you may need a second coat, if so, let that coat completely dry. I let the base coats dry over night to make sure they're not going to smudge on me.

The characters I am doing are Iron Man, Harley Quinn, Batgirl, Captain America, T'Challa & a vibranium nail, Hawkeye, Wolverine, Gambit's charged card, and Batman. I have designs for a LOT of characters, so it's really hard to choose which ones I want to do, once I find one that works I will sketch it out. If you'd like some ideas, feel free to take a gander at these babies:


Next you start designing. each layer of design needs to dry before the next so...more patience.
For Captain America's shield, start with a white base and a red tip, then cut a piece of tape into a shape like this: -^- as if it were half of a star and lay it over the bottom portion of the nail to mask the white you will be keeping. Also, you need to cut an arched piece to cover the tip for the red you will be keeping.Press these firmly to the nail surface so no polish gets underneath. It will look like this:
Now take some blue and cover in between the tape to create the blue shield portion. You may need two coats. When the polish gets tacky, peel the tape off fast for clean lines. Allow the designs to dry and apply a top coat.  BAM! 

Here are some designs from earlier this year:


These are sure to wow everyone who sees them. If you'd like a specific nail how-to let me know via the comments section...these are all really simple nails, and you can make them even simpler just by using a color scheme. Hulk could be neon green nails with purple shatter polish over them. Bat nails can be black nails with yellow tips. Also, I will be randomly selecting someone to choose a character and receive a set of themed nails from the comments below, if you're interested, simply comment below by January 31st with your favorite characters! Bye for now guys!

Thursday, December 20, 2012

Gifts for/from the Crafty Nerd

Well it's the ho ho holidays, as I have shown my gift wrap, perhaps I will show a sneak peak into the presents inside These are in no particular order...in case any of you receivers are wondering!

For the ladies:
Steampunk EarCuff (tutorial to come)

Nightmare Before Christmas Shoes


Tutorial can be found here: Nerdalicious Shoes

Rogue, Gambit and Black Cat shoes for my bestie (she already opened them...reaction=redonkulously excited)

Mermaid Bauble Necklace (tutorial to come)

For the gents:
Steampunk Bat Cowl (Tutorial to come)

Side view
As well as a whole mess of gifts from (love these people) Superhero Stuff

Since I didn't get to decorate much this year...I tried to transform a few main things to keep a bit of festiveness:
top hats on the coat tree

small "floral" steampunk arrangements in top hats around the house
Trying to get a tutorial up for you guys...also when I do my comic nail tutorial there will be a giveaway! WEEEEE! Happy Holidays guys!

Sunday, December 9, 2012

Comic Wrap Update

Happy Holidays to my Geek brethren

You remember Batgirl from last posting? Well here are a few more...as you can see some of them require absolutely no artistic skill. I'm gearing up for next weekend when I will actually do the decor inside the house. That will be mostly Victorian/steampunk inspired so stick around if you're interested. Also coming up...and early holiday gift to myself: Marvel Cookie Cutters as well at the Spidey Comic cover version. I will be designing a couple others to join the four characters included in the set for my annual Game Day. I will, of course, do a tutorial! Here's a little preview.


I also may try doing a giant Nightmare Before Christmas Wreath over the garage... we will see if that is a reasonable project in the small amount of free time I have this season.
Two other tutorials on the horizon are an octopus necklace/steam earcuff tutorial, as well as a "how to" on my popular scales eyeshadow.
OOO! Speaking of scales, my Viper (Madame Hydra) costume has been put on delay and I have decided to perfect my Steam Zatanna outfit to redo some classic Zatanna comic covers. If you guys have requests let me know. This is only if I can borrow some of my photographer friends on the weekends. Considering WonderCon isn't for a couple months, I'm going stir crazy.
Until next time comrades...

Monday, December 3, 2012

Custom Comic Wrapping Paper for Gifts!

Hey ya'll!
This has to be my second favorite blog post...the first being what I'm wrapping (Madame S's custom Batgirl heels. That tutorial can be found here: Comic Heels) It is a really easy, thoughtful way to a: incorporate the theme of your gift, personalizing it for their favorite character, b: gives a little hint as to the gift itself and c: for this particular type of gift a custom shoe box that will hopefully have a special pedestal in her closet forever after ;)

The only thing this sucker is missing is a cape...brb
Batgirl Shoes, with their sticks to keep their shape, wrapped in tissue.


All you need is colored gift wrap/paper/foam in the theme of your choosing. Batgirl #3 Stephanie Brown (Bryan Miller's batgirl) has Purple Black and Yellow on her costume so I took Glossy black paper, Matte purple paper, and bright yellow craft foam for the belt and bat symbol.
You will also need scissors, tape, black marker, and hot glue.
Oh! I almost forgot...you will of course need the gift itself...Mine came in a box, if yours doesn't have a box...get one, it will make your life SO much easier to wrap a square object. If you don't have a spare box lying around fear not! I will post photos of gift bags done in the same design.

First Batgirl #3's utility belt is really distinctive, it has those dome-like circles in the center and the rest of the belt is filled with pouches! I took a piece of craft foam, sketched out the design and chipped away at it (cut) until it was the right length to surround 3/4 of the shoe box.


Print out a bat symbol or freehand draw one onto the same yellow craft foam and cut it out as well.

Now that the hardest part is done, get your wrapping paper. I wanted to showcase all of Batgirl so I did the top of the box in black and the bottom in purple..turns out...I love it.

Glue the bat symbol towards the top of the box, and position the belt slightly above the bottom. I wanted her to be able to open the box without ruining the wrapping aka tearing the crap out of it to open the sucker, so in order to accomplish that I hot glued the circle on the belt to the middle of the box, and took two rectangles of yellow cardstock, tape or glue them to turn them into slots to slide the belt into (see picture below.)
In case the type on the pic is too small it reads: Taped the cardstock to the box to create  slots to slide the ends of the belt in to.

TADAAAAAA!!! The best damn wrapping paper EVVVAAARRRR!!!!

To a great gal, I hope you la-la-la-la-la-love them!

Bryan Miller's Batgirl

Ok as promised....here are some bag pictures...I think I will continue this craziness for all my presents and take a group photo if you will when I finish <3 I hope you guys enjoy this, if you have any questions, comments, or would like some ideas on how to do a certain character leave me a comment below. Thanks for reading!
The whole collection:


Saturday, December 1, 2012

Dog T-Shirts and Upcoming Projects

I am kicking holiday butt, finished my shopping, and am down to waiting for my wrapping paper to arrive from Amazon so I can start my comic character wrapping tutorial. Also, I am getting my nails ready to do my most often requested Comic inspired nails tutorial. Here are some pictures, I apologize for the schmutz all over my fingers, these are old photos:
Left to right: Hulk, Ant-Man, T'challa, Aquaman, Cap

Iron Man & War Machine

Left to right: Michelle Pfieffer Catwoman, bat, wolverine, Gambit, Wonder Woman


Anywho, This tutorial is for those of you who have pets. We all know that there is a very limited selection of super hero merchandise for dogs, except for these over at my friends at SuperHeroStuff who happen to have a good array of pet stuff. However, I have two very large dogs. There aren't many dog clothes that fit my wolf mix, even the XL sizes tend to be just a hint too small. He loves shirts, I think something about them encompassing him comforts him as he was abused in his former "home." I wish I could get a picture of him and his comic shirt collection for you, but he happens to be scared of the camera, so we'll just use my GSD for this tutorial. If I couldn't find dog apparel in his size, I was going to learn how to make them from my old shirt collection, and it turned out to be SUPER easy. This isn't complex, there is no sewing involved, and the only things you need are a tape measure, shirt, and scissors.

First select a shirt that is the right width for your dog, my GSD is a small shepherd so this is an Adult Men's Small (B A and Murdock are my favorite characters, but I can never find A-Team merchandise...this was found at SHS's website!!! They have the biggest collection I've seen.)

Next, cut around the collar to take it off. Once you cut a cotton shirt, you can pull/stretch it which will cause  the edge to curl up so it won't  unravel.

Measure your dog from the breast bone to the top of their belly. For make dogs you may want to make it a little  less  so they have extra room for  wizzling. My German is 13"

Next you'll want to flip the shirt so the side that will be down is facing you, and measure...HEY the little dog I dog sit is hijacking my tutorial.

It took me 15 minutes to get the shirt back from him. And that was with bribery, toll paying, and pets.

From the collar measure how long you need the chest side, and cut that side straight off at the length you need.

Now flip your shirt over. Starting from where you left off the chest side, cut the side that is on their back into a giant U shape.

Dont forget to stretch and pull the edges so they curl instead of unraveling.

B A German Shepherd. If the sleeves are too uncomfortable for your dog, take off the shirt and cut them off a little past the seams on the shoulder side. This will create a muscle shirt look and be a little more roomy for your pet!