Tuesday, December 16, 2014

DIY Geek Gift Ideas

This post is super last minute for the holidays, fortunately most of these crafts can be made in a day. That's right. One day. The best part is, your friends or family members won't give that a thought, when they see how special and personalized the gift is. If they do think that it's a fast and cheap gift, blegh, you don't need to be friends with a greedy materialistic person.....that's just my opinion because these gifts are super awesome, and I'd love to receive them myself. Not to mention, many of them are past gifts to some of my friends.

Not only do these not take much time, a lot of them are wallet friendly. There is a little something for every age/every fandom.

One of my most recent posts would work for a Disney fan so head to that, and show your friend you know their favorite things by customizing them a pair of Disney ears. Custom Disney Ears Tutorial

So here we go with some mini tutorials, and links to my past tutorials to show you techniques!

I love make up. It's no secret. I have buckets of make up, I think it's a mental disorder... so this gift was inspired by my crazy make up looks I do when I go out. A lot of people ask what make up I used, or "hey is that inspired by _(insert character here)_?"
I did one of these simple and inexpensively priced sets for a friends birthday, you can make it as expensive as you want depending on the make up brands you choose. This particular character is Cheetah, and you really don't have to be able to draw at all. There are a ton of blank eye shadow diagrams on the internet that you could copy/paste, and type up instructions on a word document, then color in the lines. You could easily turn this into a comic nail art gift, with the colors of a character, and a diagram of how to paint the design on a nail.


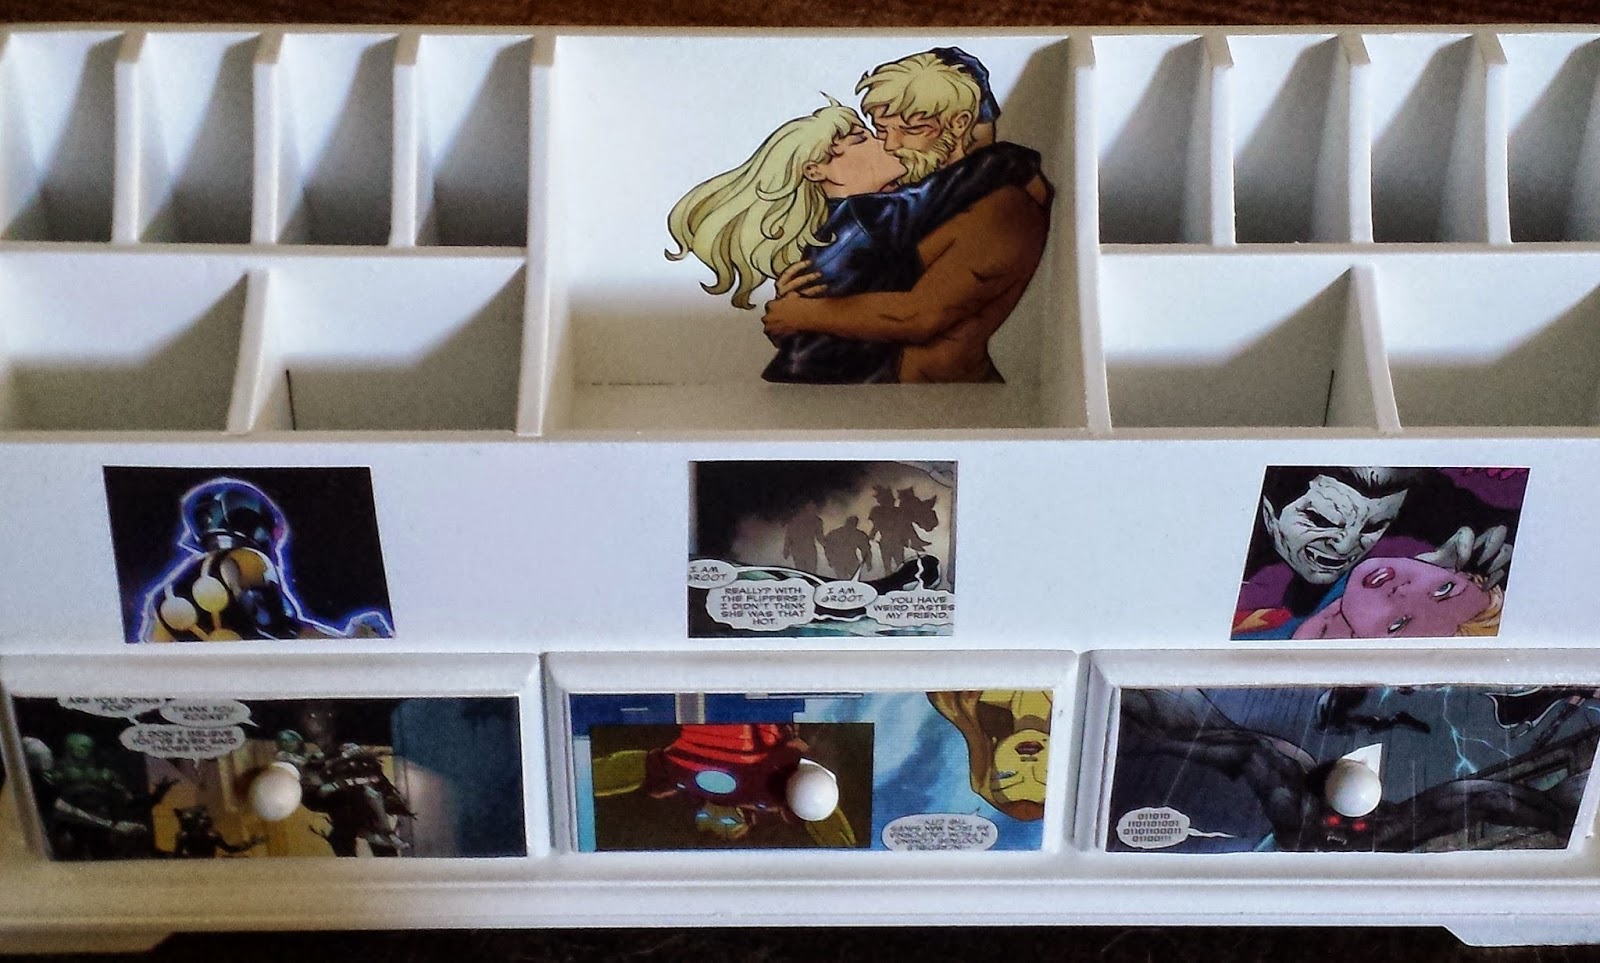
 This is a make up organizer (see? it's all about make up) you can pick up for extremely cheap at Big Lots or Walmart, or even more likely on the internet. All I did was cut out some comic scenes and mod podge them to my organizer. The sky is the limit here. You can paint it and then mod podge ANYTHING the person likes on this thing. You could put glitter on it and seal it with mod podge. You could line those little drawers with fancy paper. You could then fill it with brushes and make up if you really wanted. And then you could put a little tag with a diagram like the one above of how to do a special themed make up. (I'm really pushing this make up thing)


Oh my gosh...All this talk about make up and nothing for a run of the mill male comic nerd? AAAAAAAAA! Wrong. Here is a frame. A simple cheap frame from Michael's. Mod Podge + Comics (Specifically Grayson, Tim, and Stephanie) You can then put a super great print from any number of artists in it, or leave it empty for a comic cover or print you know they have.

At this point you may be thinking, aw poo, I don't have any comics (shame) or any that you'd be willing to cut up. Or furthermore, any comics that your friend reads/likes. Or even FURTHERMORE, my friend doesn't like comics, but he or she likes _______. Print out anything on regular paper and use mod podge. You have NO EXCUSES.


Hey, back to fancy stuff. Remember way oh way back when I wrote up a post about how to customize a pair of shoes? (I think I wrote 2) Here are the links, go make your fancy friends some shoes. (Again, sky is the limit. Disney, Anime, Comics, Doctor Who, Supernatural, Labyrinth, the list of fandoms is huge)


One of my new found favorite weapons in the old arsenal is Sculpey. Seriously, there are tutorials ALL OVER THE INTERNET for everything you could possibly imagine. You can make ornaments, jewelry, props, hair clips...it's crazy. Popular things? Tentacles. Make your friends some tentacle things. Because tentacles. You just roll out a snake of sculpey in the thickness you desire, shape it, roll tiny little balls and push them on with a pencil to make the suckers. Bake it according to package instructions. Done.


You can also get clever for the holidays and theme the tentacles, I've done several pairs of these candy cane ones, they are so hot right now!

Are you good at crochet? Knitting? Whip up a character themed scarf or hat. Again, billions of tutorials on the google. Here we see my attempts at Gir from Invader Zim scarf with pockets, and hat.

 This hat is my favorite. And the friend really really loved it.
 This was a gift for myself. I found a 12 dollar table and put my favorite characters all over it. I then sealed it in several layers of clear coat spray paint.
 Last but not least, gift wrapping can be part of the whole gift too. Don't forget my previous post on gift wrap, seen here:
Comic Wrap

I've been doing a lot more styles, if you follow me on Facebook or Instagram, you know all about them, but here is some new eye candy. A quick version of Aquaman:


Also, here is my favorite gift wrap look of the year:
You've got a little pouch on the belt to hide something small in, it has a cape, and pecs!

I think my favorite look from last year was definitely nightmare before christmas paper, which you can either find on www.spoonflower.com or make yourself with whatever background color and sharpies. Bows can be made with big black ribbon and white paint, or one tutorial was all about duct tape and white out. (Kinda messy process.)

I hope this was helpful, Merry Cthrsthmasth from Cthulhu!

Stay tuned for my Monster High Cosplays and corresponding tutorials coming soon!

Monday, November 10, 2014

Female Winter Soldier Cosplay / Groot Progress

Hello all,

I thought I'd quickly share a completed Hydra project, as well as an ongoing project so you can see I'm human and all these projects aren't always quick and easy.

I had a great time at this year's C4 Con! I had originally planned to debut Winter Soldier at Wondercon this year, but once I got to the con I realized that several pieces of it were broken, and I had to completely redo the arm with fabric instead of foam.
I needed accessories and didn't have much extra money at the time. I assembled what I had on hand and surfed the YouTube trying to Frankenstein my way into some smoke grenade canisters. (Mainly because I love me some Red Skull toxin.)

Project 1 (Quick & Easy) This project will literally be done in the blink of an eye. The longest part of this is waiting for the paint to dry.

I needed accessories for my Winter Soldier Cosplay and didn't have much extra money at the time. I assembled what I had on hand and surfed the YouTube trying to Frankenstein my way into some smoke grenade canisters.

Hydra Red Skull Gas Grenade Canister

Things you will need:

Toilet Paper Roll
Printed design of your choice to wrap around the toilet paper roll ( I just used a word document where I cropped a hydra logo and posted a few text boxes)
Mod Podge and Paint
Craft Foam
Ruler
Pencil
Hot Glue & Gun
Key Ring
Bobby Pin
Newspaper for stuffing

 Step 1:  Cutting out your foam pieces
Draw 5 circles for each grenade (The diameter of the hole of your t.p. roll)
Draw 2 3 1/2 inch rectangles for the handle for each grenade
Draw 3 3/4 inch rectangles for the top of the handle for each grenade.
Draw 5 1 1/4 inch odd shapes for each grenade for the top of the grenade where the pin goes through. In the photo below it is the slanted rectangle, the right side of which has a concave.

The reason you need multiples of each is because craft foam is thin, and you want a grenade that won't smoosh. Yes, that's a technical term.


 Step 2: Gluing
Once you have cut them out, glue 3 of the circles together for the top, and the two remaining ones to each other for the bottom.

Glue all five slanted rectangles together, three 3/4 rectangles together, and two of the long rectangles together with the top circles as seen below.

Top sections, bottom circles, and hydra design
Step 3: Glue the bottom circles in the toilet paper roll, and stuff them full of newspaper to ensure they don't "smoosh" in the middle. Then, slide he top piece in with glue.

If you have any excess pieces anywhere that aren't smooth, trim and smooth with hot glue.
 Step 4 Paint!!! Paint everything silver, and dry. Wrap your printed design around it, glue it into place.

Step 5: Details
Make a hole using a small screwdriver or dremel. Slide your keyring onto your bobby pin, and push the booby pin through the hole (see picture below)  and then hail Hydra!

Now for my ongoing Groot cosplay progress. I have been sitting and texturing bark pieces for-ev-er. What do I have to show for it? Just a pair of shoes.


My gnarled and twisty roots, complete with moss!

These puppies took forever, mainly because I couldn't figure out how to do it until my AHA! moment.

I used aluminum foil to construct the shapes, and heavily taped them onto the base shoe.

I then heated a sheet of craft foam and laid it over the shoe, pulling and pressing it to take the shape of the aluminum roots. I found that I could shape it better when I hot glued the middle in to place and kept heating up each "toe" with a hair dryer and shaping, then gluing in to place. The longer you take on this step, the better they will look.


Bottom of shoe. I later on painted these brown, just in case.


After you add mod podge they become shiny like the leather of the shoe. It also creates an easier canvas to paint on.

In that picture of the final shoe you can see bark detail, veins, etc. All of that was done with paint, puff paint, grooves in the original foam.

I hope you liked this post. If you have any questions (because I am sure I didn't list every minute detail) just comment below!


Monday, November 3, 2014

Custom Disney Ears (DIY Style)

A while back I had an inspired idea to make some mickey mouse ears in the style of characters my friends and I loved for when we eventually can get our group butt to Disneyland.
I had no clue what I was getting in to, because other than a headband I didn't know how to do anything remotely close to mickey ears.
I had an excess of ribbon spools from a bridal shower I had worked on, so I thought "excellent" in that creepy voice and forged on using those as the supports for my ears.
My Little Mermaid ears with a Flounder inspired bow!


What you will need:

Headband
Hot glue
Craft foam
Empty ribbon spools
Anything you want to decorate with (Ribbon, Paint, Glitter, Etc.)

How I did it:

 I traced the two circles plus a strap in between (the width will depend on how wide your headband is, I needed about an inch-inch and a half) so I could secure each ribbon spool to the headband. You'll need one of these for each ear, so make two while you have both ribbon spools to trace around.


Detail for a Rocket Raccoon inspired set.
I highly recommend adding your designs (and letting them dry) before you attach your ears to the band. Same goes for anything you may want to put on the headband, just be sure to leave the sections bare for the ears!
 Next step is to glue all the pieces together one side to the ribbon spool, wrap the other under the band to secure/glue it to the back of the ribbon spool as in the pictures below.
Ariel!


So here was a slightly more complicated set of my favorite fur ball Rocket. For the fur I just brushed yarn until fuzzy, and hot glued it on. Then I trimmed it into the right shape.

After glue, needs a trim
 Alternatively, you could most certainly use plushie raccoon ears, because that would be 100 times easier and probably look more "raccoon" like.
Rocket Raccoon ears all trimmed up WITH A TAIL!
 Tail....I just used a yarn tail tutorial straight from pinterest. Basically its a braid of yarn (I braided mine around a wire to be able to shape it) and then tied on strands of yarn. A lot of yarn, a lot of brushing, a lot of straightening.

Side detail
 And there you have it...Disney ears for any character!


Wednesday, October 29, 2014

IIIIIIIII'M BAAAAAAAAAAAACK!
Hey everyone (or anyone who still randomly reads internet posts from a while back). 

So many life changes have happened over this last year it's been very hard to keep up a perky blog post. That was until I realized something very important: I hadn't stopped crafting, I hadn't stopped cosplaying, taking photos, I was learning how to do many new projects and techniques. You see when I am upset, depressed, frustrated...I turn to crafts of some kind. I guess it's my mind's own way of working through whatever it is I am going through, and if I started this blog for tutorials and crafts, then by god, tutorials and crafts should happen on it, and maybe show others how to do something, or even just inspire them to make things, instead of just wallowing in my own frustrations.

I thought starting this blog a while back was a great idea to help me through what I knew would be a hard year, and instead it just frustrated me that I couldn't seem to work up the nerve to write for weeks at a time. I felt guilty, "I should be doing this, I should be going over that, I should be working on something else."

For most of my life, from my first memory forth, I didn't know what was outside my house's walls. I believe I may have written a post about this before, that I didn't even know what conventions were until a few years ago. I was crafty, normal art type crafty that is. I thought I had to give that up a few times, first based on some rotten family members telling me I should stop frivolous endeavors and concentrate on lucrative subjects in college. I worked up the courage to pick a pencil back up a few years later and had lost all of what I could do with it. I was forced  (or thought I was forced) to put the pencil back down soon after as my nerve damage limited the amount of detail work I could do without shaking and ruining a piece. Then I discovered so many forms of crafting. SO MANY!!!! I even discovered different techniques of sketching and painting which allowed for my aching hands without completely destroying the piece. (Big shout out to the internet for teaching me all this.)

I still ruin a lot of projects I am working on, because I haven't quite learned to quit while I am ahead and put the rest away for the next day. My head is still willing to work, my hands on the other...hand....But I don't stop. I don't give up on art altogether for months or years at a time anymore, which has been very beneficial to my brain.
So, here I am again, and even though I can't go to Comikaze this weekend (BECAUSE KEVIN CONROY, and other amazeballs people will be there) I'm planning for Wondercon. And if you are going to comikaze, please run over to my instapal "Alexandria_theGeek" and get a picture with her in one of her amazing cosplays, on Halloween she'll have candy for trick-or-treators.

I have a few tutorials I am tidying up, as well as a few outlined for future projects. There will still be a delay/drag time in between posts. I am still in the process of renovating a house, but that just means I get to nerd theme an entire building and have more post material once it is done.

Enjoy Comikaze/the weekend!!!!!!!!!!!!

Tuesday, April 8, 2014

Stranger! Also Wondercon 2014 Update (Winter Soldier Rule 63 Cosplay update)

I haven't posted in a while and here are some of my excuses:

  • I am a Maid of Honor (or my version "Best Woman") in a completely DIY wedding yeah...everything is being designed and made here at nerd land. (If you guys want a little sample of those projects I just might make a post for it.)
  • One of the dogs decided to have diabeetus.
  • Someone in the family was diagnosed with a rare form of leukemia and is still in all the testing phase.
  • $$$$$ Cosplay projects take mula! ETC.
I do apologize as I haven't even been on here to say that I'd be in the shadows for a while, and I wasn't 100% sure I'd even get to go to Wondercon this year for those reasons above. BUT, I am PUSHING to go at least one day, because like many of you this is my free time, my fun time, my favorite place outside of DISNEYLAND!!!!!!!!!!!!!!!!

Many of you follow my instagram (nerdrendezvous) or facebook page and know that I have been working on a special new cosplay from materials I had laying around. For a few months I had delusions of grandeur that I could sew this magical looking arm for Bucky (SPOILER for those of you who don't read the comics, or watch the movies...) who is Winter Soldier. Funny story, you can't just fall asleep and wake up with magical sewing powers. So the project got scrapped until I saw the movie a few times and decided to rack my brain and figure out how to do it. The rest of the costume is done, so two weeks would be plenty of time to do one lousy arm right? I'm sometimes better under a time line anyways.No...that's a lie. I become desperate and sleep deprived and the end results are usually crap. I'm going for it anyways! WOOHOO! Here are the photo's from my facebook/instagram if you do not see them:


beginnings of the lower arm
Miscellaneous pieces of the costume

OH! If you do follow my facebook, you'll know I started what I could for Abbey Bominable cosplay, and was thinking of doing a few Monster High inspired make up looks for here. The first of which, of course, was Abbey nails!
I wanted a sparkly snowflake effect, but if you stop @ step 2 they look like Cinderella nails! And of course true yeti nails would be a little more oval shaped, but mine weren't long enough!

Here is the border for Abbey's dress, cable knit crocheted, by me!
So, if you are going to Wondercon, I hope to say hi! I hope to be on here a little more often once a few things calm down a little!

Saturday, December 7, 2013

Confessional

Hey guys, It's been a while. <insert excuse which is really just a cover up for being a busy adult with many important things to do>
I'm about to get real people. I'm not sure how a confessional starts because I don't believe in that business....but I did want to confess a realization I stumbled upon while getting out the ol' animation series to watch this evening.
You know how once boys and girls get to the "crushing" stage they have minor or serious crushes on other people in their schools, or even actors/actresses they watch, etc? I didn't.
After a conversation with a close friend I stopped to think about my schooling. I was not interested in a single person there.
My first crush was Batman (duh...you should've guessed that by now) followed closely by Goliath (yep...the Gargoyle) Girls will talk of Prince Charming or Prince Philip... I chose Beast. Now I'm not talking that pansy, feminine blonde prince guy he was. I'm talking hulking were-monster. I was devastated when he got turned back in the end of the movie. I won't even watch it anymore.
I would look around at the people at school and they were NOT interesting to me. How was I supposed to crush on the local boys when they were not my cup of tea?
 I was way past 18 when I honest to god had a crush on a person. Don't get me wrong, I had had relationships, but I had them because I was trying to do what was considered "normal". Dating for dating's sake. Nothing wrong with that people...I'm just saying I realized it is not for me. I was bored. SO BORED. They'd blather on about things I had zero interest in, take time away from my true loves, and I stayed for no reason other than I thought I was supposed to. Once those relationships ended I was relieved. Happy. I'd make that mistake over and over until I put my foot down some time later. (Which I really want to erase ALL of those relationships because I really didn't learn anything except that I may have been a masochistic moron.) I do not miss being that ignorant.
Anyways, good night ya'll I will try to get some posts up this month.

Thursday, October 10, 2013

Batman Themed Bathroom ( Batman Curtains / Wayne Enterprises Candles DIY Tutorial)

Okay, for those of  you who follow my Facebook or my Instagram @nerdrendezvous you'd know I've made progress on my Batman/Batgirl themed bathroom. Mostly DIY with some altered store-bought stuff, it's going along pretty well. I thought curtains would be easy to make myself, and I was right! For once a prject that didn't turn out to be harder than I thought. So....let's begin with some SUPER EASY DIY stuff for any room, not just bathrooms!

Wayne Enterprises Decor

What you will need:
Flameless Candles (preferably wax coated)
Pencil
Printed out Wayne Enterprises logo
Scissors
Tape
Paint & Paintbrush

Cut out your logos to fit/center easily on the candle. Cover the backside of the logo paper in graphite (basically scribble all over it, nice & thick.)

Tape the logo where you'd like it on the candle, and trace over the logo with a sharp pencil.


On the left you see the taped on logo after being traced, and on the right you see what it should look like after trace.

Fill in your traced logo with paint and wait for it to dry. Make a mistake? if you have the wax coated flameless candle, you can very gently scrape off the oopsies.


Batman Logo Curtains

What you will need:
Fabric
Pins
Thread
Sewing machine
Iron-on transfer sheets you can print on with your own printer
Iron


You will need to measure out the length of the curtain rod/space you are putting the curtains.  I added a little extra so the curtain would be frilly.  You also need to measure how long you want the curtain (how far it needs to hang down) and add 3 inches to that number (you will fold that over to create the loop to slide the rod through. Here's my pithy sketch version of that sentence:


As you can see (you probably can't but I am pretending my scribbles were actually legible) I used 2.5 yards of cotton fabric that was 44 in. wide to make both curtains. Yay for planning and saving money.

You'll have to lay out your fabric right side down, mark all this out and carefully cut the two pieces out. If you did it like I did, where both curtains were cut out from the bottoms of the fabric, you won't need to put seams on the bottom of each, because the bolt of fabric they cut your material from should have sealed edges.  Fold in both smaller sides, the "ends" if you will (using mine as an example, the sides that measured 15&18.5) 1/4" and hem them.
With the right side facing down, fold the raw edge (the top, or on mine the 2.5&1.5 yrd side, you cut) over the top 2.5-3". The 2.5-3 inches will be the right side of the fabric, you will pin/sew a line 1/4" from the bottom of that edge (3" from the top of the curtain) and then sew another line 1-1.5" from the top depending on how wide your curtain rod is.

If you squint, you can see the two sewed lines on the left hand side of the picture which is the top of the curtain. I flipped the fabric over to show the right side in this pic.
Mark the center line(s) for where you want your bat(s) to go.
Iron on your bat(s) according to the iron-on sheets instructions. 

Since I had scrap I used it to make some strips for bows. Just sew the rectangular strips on to both sides of the curtain (4 pieces for two bows) and then tie them into bows.

Presto chango normal boring curtains are now gone! Also Ignore the hideous wallpaper in these pics...this is one of the reasons I decided to change my bathroom around, and will be gone as soon as I figure out what is behind it.

Custom Towel Rack

Paint
Mod Podge
Comics
Scissors
Clear Coat (Waterproof)

I simply painted my existing towel rack black and purple, used some mod podge/comics to add a few details, and then clear coated it a few times to make sure no water could harm it. Wait for it to seriously dry before exposing it to the damp bathroom conditions. I waited three days before I put it together and hung it in the bathroom. Again...ignore the wallpaper.


Tadaaaa.....another detail I added was my Haunted Arkham Asylum print by artist Abe Lopez which can be found here: http://artistabe.deviantart.com/art/Haunted-Arkham-Asylum-367228568

I am currently designing some drawer pulls and other little touches to make it a little more batty in my bathroom. Not to mention.....my newest cosplay is almost complete. I hope to release it next week or so....;)