Tuesday, January 29, 2013

Steampunked Comic Character Decor

Let's just do it. Why not? Let's just mix my two nerd-ons. Steampunk AND Comics. Better yet...steampunk and Batman. I know...it's been done, but not quite like this. As an artist who can't draw humans very well...I had to think of a way to steampunk Batman for decor purposes (and technically gifting purposes, you know who you are, and the mask better not be damaged) All that came to mind was a tutorial I found on Steampunking Darth Vader...which was AMAZING. It can be seen here: Steamy Project Reveal at EPBOT (Geeky girls!) In the tutorial this lady takes a Vader mask, trims it down, alters it and presto, it hits me: do the same thing to a bat mask. Which was of course NOTHING to the scale of the Darth Vader Mask (although for about five minutes I had delusions of grandeur, a gas mask function...glowing lights....) mainly because I didn't have all the materials she had, but I made do.
What I used:
A bat mask from Target (or any toy store)
A Dremel Tool (you don't need one, you could punch holes with a punch or a hammer/nail combo)
A thin sheet of craft foam
hot glue/glue gun
Clock pieces and cogs
Spray paint in silver/gold/whatever you want to use
brushes and acrylic paints for details
puffy fabric paint (for the welding dots)
What I didn't, but should have used: Plastic primer paint. I highly recommend starting with this. I bought some for the next project.

I had this mask to start:
I wanted a few breather holes in the ears, so I drilled them with a dremel. You can do this with a wide nail, or a punch if you don't have a Dremel. For welding lines I used thin strips of craft foam cut to the shape I made on one half of the bat mask. You can also achieve this by globbing hot glue in the same lines, the foam is just a cleaner edge. To get the rivets, just dot on the puff paint and let it dry. Make any holes/welding lines/rivets you want now so the primer (or in my case paint) covers everything.

What I should have done next: PRIMER
What I did: weeeeeeee spray paint weeeeeeeee
And I ended up with this:
It doesn't look half bad at this point, but the primer would have ensured maximum sticking ability so the paint wouldn't chip off, bubble up, or peel away. Which it does if you bend the mask. :/
I didn't like the clean edge on the welding lines so I took hot glue and smeared  it along the edges. (do not do this with your finger...) Which means: more spray paint!!!!!! WEEEEEEEE
After the spray paint dried, I took a dry brush and gold paint over it to tarnish it up. I scratched a few places and filled them in with a gun metal paint:
Next I super glued  on some chains, clock pieces, and gears to the welded side of the mask, and I took some honeycomb looking chicken wire and molded it to the opposite eye with hot glue, which also covered any raw edges that may scratch your eye out if you plan on wearing something like this... This is one of those projects like many of the ones I have done that is only limited by your design.
Hang it on the wall....wear it....make a stand for it... or give it away to never see again :(
Keep in mind this was my first attempt. I rushed it, as I do when I am excited about a project, and it could have been sooo much better. But I learned my lesson and as always I will get better if I practice....When I revisit this project, I will share it here with more tips on how to get better details! Wolverine next time? Spider-man? Magneto? The world is mine!
P.S. Wonder Con tickets went on sale...Wonder Con I hope to see you all there. Remember, I will be Viper and you can almost assuredly find me at the Superhero Stuff Booth (I will post the # as soon as they update the exhibitor map) Go team SHS! Can't wait to see all my friends!

Wednesday, January 23, 2013

Cosplay Time 2

Madame Hydra or Viper lips. How does she get that green/black quality? Venom and toxin! We will NOT be using those in our portrayal of Viper! We WILL be using a super cool technique that you will love for future cosplay! All you will need is a sharpened black pencil eyeliner (preferably kohl,) black lipstick, flat black eyeshadow, and a metallic green eyeshadow.

I used the lime green (purple arrow) which is in the ELF $10 palette
They look black but shine green which is hard to capture with my camera! Fear not...I will post the complete Viper look from Wonder Con!!!!

You can choose to use the same fishnet scales technique from the Viper #1 tutorial if you want green scaled lips, you'd need a spare bit of fishnet.
I highly recommend using a lip scrub or exfoliating your lips and moisturizing them at least once  a week, it makes them softer and fuller and provides a better canvas for any lipstick look, this one being no exception. And I use these: Skin Noms they are 100% natural sugar scrubs that come in sinfully delicious flavors...mint chocolate chip, snickerdoodle...even chocolate orange! Also..why not support small businesses? They leave your lips soft and deliciously ripe for this tutorial.
Take whatever foundation or concealer you use and pat it over your lips so you start out with a nice blank canvas. It will also make sure the lips last longer.
Apologies for the darkness.

 I know...this is a scary look! Don't worry it gets scarier!
Line your lips with the eyeliner pencil. then take a flat liner brush and pat on the black eye shadow over the liner, this ensures that no feathering or crazy bleeding lines will occur later on.
Notice it's semi thick? I lined my lips in a thin line then with the liner brush and eye shadow, pulled it in towards my mouth to fade it in.

 Now fill in your lips with black lipstick. Don't worry if it doesn't look perfect quite yet, the next step will smooth out and fix any spots or smudges.

 If you want the scaled look lay the fishnets over your lips, and pat on green eye shadow. If you just want the green sheen over black, pat the green eye shadow directly on the black lipstick.

 Use the black pencil to touch up any areas that may have been smudged, or a concealer pencil to touch up your skin, and voila! Pucker up ladies, your lips are now dangerous weapons of doom. Next on the Viper list: facial scars using eyelash glue. See you next time. Hail Hydra!

Tuesday, January 22, 2013

Steampunk Keyboard Mod

Here at last....the much anticipated Holy Grail of my projects thus far....how I turned my run of the mill Dell keyboard into a sassy, steamy, typewriter looking, fully functional, keyboard supreme mother clucker.
This tutorial is NOT easy, in fact if you do not have patience turn away now, or just admire the pictures. Here is a picture for your viewing pleasure:

I have to say had I not known people in the machine shop field...those keys would not look that good...having said that I want you to know you can totally do this without a cnc lathe. You can easily make the keys out of the existing key board keys, a torch, a steel tube, and a drill press. I even saw a tutorial on heating up an Xacto knife....on second thought....do not attempt that. I nearly lost digits that way.
Ok let's start this project up!
Get a keyboard with easily pop-off-able keys, use a flat head screw driver or some pliers to just pop them off super quick. Take a picture or keep the keys in order, as some of them have different size bases, just for faster assembly.

Unscrew the face plate from the keyboard! Be sure you save all the screws and keep the underside of the keyboard safe, as you want to be able to use the keyboard when finished. If you want to keep anything the way it is (the little window for the Caps Lock/Num Lock etc,) tape it off with some painters tape. Spray paint the face plate whichever metal color your prefer. I always like the silver/gold tarnishy combo, so that took a few layers to accomplish. I can not stress proper spray paint technique enough. It's the key to a smooth finish, and you want that. If you let the paint gunk up, the keys may not fit back on. Hold the can of spray paint at least 8 inches away from the face plate and lightly/evenly coat the face plate, let it dry and go back in with the next or same color, always letting it dry in between. After you let it completely dry, screw it back into place on the keyboard.
Ok...now for the hard part. Those pesky keys! You can make then whatever shape your heart desires, so long as you keep the post that pops into the keyboard the way it is. I wanted typewriter round keys. To achieve this, you could do something like this: Make keys round with a drill press
I know people at a machine shop, so they took the keys and cut them on a CNC lathe. Then you have something that looks like this:
Next: to paint the keys. You can totally skip this step if you want, if you will be covering them with a sticker or decal. I wanted them to be sassy and brassy, so I had to paint them. If you choose to paint them DO NOT PAINT THE LOWER 1/4 inch OF THE "STEM". You don't want to paint the part of the key that pops back in to the keyboard. Paint layers make it too thick to smoothly pop up and down, it will get stuck and be hard to pop back out,which is also not exactly suitable for a working keyboard! Two ways I thought of to do this, you could tape off each key bottom, or you could take a cardboard box, and stick the keys into it, up to the part you want to be painted. This way you can paint more/all at one time.
The bouquet holder option: DO NOT use styrofoam to hold your keys, it will melt onto the plastic key when spray paint hits it.
So...two-three layers of spray paint later, pop your fully dried keys back onto your keyboard. Do not worry if at first they stick, just pup them up and down a bunch of times and they will work again. You can choose to stop at this step:
But why stop? Take some antique finish paper ( I will show you how to make your own in a later tutorial with just white paper and tea) and print out typewriter style key covers, like these:
Cut out carefully with a detail cutting tool.
It was semi time consuming to make the new keys on Publisher, but if you'd like a copy of my PDF which has all the standard keys and a few blank ones leave a comment here or go to my Facebook and message me, and I can send you the file. Apply them with glue + a clear coat or Gloss Finish ModPodge. SHAZAM! You can also stop here...but again, why? I had some metal embellishments that were rather Victorian left over from my Halloween projects. Using super glue I attached them around the window for the lights and covered the Dell logo:
This thing is a beauty. It even sounds a bit more like a typewriter than it used to. And for inquiring minds...YES!!! I will be doing the rest of the desktop step by slow step. I will share my progress (however slow) here with you all!

Thursday, January 17, 2013

Cosplay Time!

The con season is approaching quickly, with WonderCon around the next corner! This year I will be cosplaying as Madame Hydra (Viper.) In case you don't know this Hydra/Serpent Squad femme fatale you can check her out here: Viper She is my super cool villain of the year! What is cosplay? Just think Costume play. Cosplaying as someone who isn't right out there in everyone's face is rather difficult. You can't just go out and buy a costume, you get to either make it yourself, or find something close at a dance warehouse or department store. I found all of Viper's green accessories at Amazon, and her bodysuit at River's Edge Dance Wear. Now for the fun part! Viper's Makeup! This tutorial will be the first of three installments, broken down into eyes, lips, and finally, scars. I wanted to put a little of a snake-like charm onto the eyes, because generally Viper is seen with green eyeshadow and a cat-eye look. So here is my take on Viper:
Scales are super easy!
To achieve this look you just need and old pair of fishnet stockings, eyelid primer, green and black eyeshadow, black liquid eyeliner and mascara! For cons of course, you can always add false eyelashes, which I will be doing for the complete look in March.

You can use any eye shadow, although I have found that the higher end ones last a little longer, you want to use a color that is going to stand out for comics, go big or go home! Here is a collection of colors for any character you choose, the big palette of colors was 5$ on sale at E.L.F. I recommend this if you don't plan on using the color more than one time! If you want something that will last longer without wearing, and plan on using it more than once...you may want to try a higher end eyeshadow like Urban Decay, Make Up Forever, Too Faced, or MAC. The one I used in the photo above was Urban Decay.
Don't worry! You don't need all of this to get the look! I just wanted to show you you can use anything you've got.

E.L.F.

Urban Decay
You want to start with your eye primed, and eye brow already on like this:
Smear green eye shadow on your eyelid just to the crease. If you are using cream shadow be sure to pat powder eye shadow on top! It will make it last longer and prevent creasing. Now to get the scales. You can do this all over, or just on a portion of your eye for a subtle look. I got lots of comments on this at Comikaze last year, and I only did the tiny part under the eyebrow, so I went for it again! Cut a square of the fish nets off to use. Take some hair clips and clip one side of the fish net in your hair. I know it sounds confusing but bare with me, there will be a picture below! Take an eyeshadow applicator, or brush and pat black eye shadow onto it, make sure to tap it so none falls off onto the surrounding area (disastrous if you have to start from scratch.) Pull the fishnet down and hold it tight so it doesn't slide around on the area you want the scales, pat the eye shadow straight up and down on it, do not smear the eyeshadow across the fishnet!

Yes! That is a Hydra shirt. Found it at this wonderful place: SuperheroStuff
Too Dark? Use a metallic color instead.

Now to finish your eye, apply your liquid liner in a cat-eye shape. If you don't know how, here is a wonderful tutorial: HollywoodNoir YouTube
Apply mascara and or false eyelashes and boom! Hail Hydra!
Stay tuned for Viper's luscious venomous lips. I will show you how to get black lips that shine green!
Also, the full look will not be seen until WonderCon! I hope to see you there, if not I will take oodles of pictures and have a whole post on the con! Don't forget to like me on facebook for more photos and upcoming projects: Nerd Rendezvous Get Cosplaying!

Tuesday, January 8, 2013

Resolutions 2013

As the new year starts, how many of you make resolutions? I don't normally, this year I made a few! 1. To get in better shape, which I am doing through a new circus fitness program (yes circus, no, not the Flying Graysons,) 2. To try new things when it comes to Nerd Rendezvous, branch out a little, maybe an Etsy shop, we'll see. Also, check it out, I made a new Facebook page so it is easier to communicate with you all: Nerd Rendezvous on Facebook!!!! And finally,  I want to spend more time with friends, which I did not get to do very often in 2012.
The greatest thing about my  friends is that we can go without seeing each other for a while, but get us together...and it's like amazing awesomeness with a side of ridiculously fun-tastic-ness. Which is why I want to be around them more often...they lift me up! Everyone needs those types of people in their life.
It is hard to work around everyone's schedules, hell, it's hard to find time to sneeze around the holidays. But I have seen a few ideas around the interwebs that I want to get everyone together for...because....you know me....I can't resist themes. I could have a craft day for my craftsters, (which I would totally share here because that's what I do.) I could also have another Game Day which was really awesome and fun. Eat like kids....and play games all day. It would look something like this:
These were my contributions for a friend's Bday game day
Just in case you've never heard of this game from a long....long time ago:
Play it.
And you could even theme your treats:
Some cupcakes hit with batarangs!

Marvel cookies!

Birthday cake for a friend (which was the reason for Game Day)
Regardless, get together with your friends. Be nerdy....be happy.

Monday, December 31, 2012

New Ways to Nerd out your Shoes!

Happy New Year! After experimenting and studying a few more ways to tweak a standard pair of shoes, I have come across a few super awesome tutorials, and had a mini brainstorm today followed by a trip to Michael's where pretty much 1/2 the store was on sale. Needless to say I have supplies for a few projects for myself...and you all...but mostly me. I am starting a pair of Deadpool shoes because I am in love with him. Also, I have some nerd inspired room decor coming up!
Back to shoes....(can you tell I have been reading a lot of Deadpool? I start thinking in yellow boxes...) These are a few of the awesome tutorials I have been reading:
Shoe mod using mod podge, glitter, and paint techniques:
GeekFemme's Blog (Also...what an awesome get together idea!)
A glitter tutorial:
Pixie in Pumps
Adding spikes:
Spiked Shoe Tutorial

I had been trying to find a way to do comic shoes with a twist after not being able to put comics all the way up a strappy pair of heels. The flimsy straps do not provide a conducive work area, and you can't just leave a weird blank space. After seeing the glitter tutorials I had solved my problem.
The pink shoes in the picture below are the culprits. I wanted to do the base in Deadpool comic, but no way in Marvel Universe will I wear Barbie pink heels. You simply can not put Wade's comics next to pink...it's illegal. Why not cover the hideous neon pink with glitter? As long as you obey what I like to call "The Glitter Rules" you will be all set.
Everything you need is in the photo! Extra Fine Glitter, Mod Podge, Tape,  Brushes, and Sand Paper!
Glitter Rules
1. Use "Extra Fine" glitter. Do not use the large chunky piece glitter.
2. Be sure you have enough of the same color glitter for the whole job. I noticed a lot of sold out colors at Michael's and they do not restock very often :(

Mask off the areas you do NOT want glitter on with tape. This is extremely important and will save you if you get lazy like I did and glop too much on.
Taped off the little heel stopper and the base so no glitter gets on them.
 Why, yes! Those are my comic nails from last tutorial! Thanks for asking. What's that? Yes... Yes it did make it extremely difficult to decorate shoes.
Taped all around the heel so that only the heel will be glittered

Take sand paper and scratch up the surface you want the glitter/paste to adhere to. I found the better sanded areas worked much better, be sure to go over all the spaces you will be glittering. Wipe off any dust with a damp paper towel.
Sanding will ensure a good adhering of glitter paste
As for the actual applying glitter to the shoe.....two ways I have seen. 1. Apply an even coat of mod podge to the shoe area you wish to glitter, then sprinkle the glitter over it until it is evenly coated and let dry. To me, this seemed like a huge mess, and a potential waste of glitter, or 2. Mix glitter and mod podge and paint on the areas of the shoe you wish to glitter. The only difference being painting on the mixed glitter and mod podge can get little clumps on the surface of the shoe, so be sure to paint them smooth.
I obviously chose to paint on the glitter, so here's how I did it:
I took 1/4 cup of extra fine glitter in blue (for the blue heels you will need more if you are coating a whole pair, I used 3/4 cup glitter for the pink ones) and poured in a tablespoon of mod podge in, mixed it together with the other end of the paint brush I used, you want to make sure you have a good mix, not too runny and not too chunky.
As you can see I left a little dry glitter towards one end so I could see which consistency was better. The consistency near the paint brush is good.

Now brush it on the shoe evenly, even if you see spaces where the glitter missed, let that coat dry and go back for another coat, if you don't it ends up a tad less smooth.
Nice even coats! HINT You end up using less if you choose the same color glitter as  the shoe.
After you coat the shoe completely with as many layers as it takes to fully glitter it up, wait for it to dry, cover the rest of the shoe (even the interior) and spray the glittered area with a gloss coat, and hurry up and wait for that to dry as well.
Pre-Gloss Coat

Now you can leave the shoes as they are, you can turn them into a themed shoe....this blue one for example is a prime suspect for a Tardis or R2D2 theme, however, they will most likely become comic oriented shoes, Tutorial found here: Nerdalicious Shoes just as the pink ones will become Deadpool shoes. I will of course put pictures up of the works in progress and finished products. I have two pairs of shoes people have requested (one is Marvel...really excited!)

Thursday, December 27, 2012

Comic Nails/Contest

Hey all. Hope everyone had great holidays.
I have been waiting and waiting and waiting for my nails to grow for the nail tutorial...but when you are into crafts this much it is almost impossible. I gave up and went to Target to get myself some fake ones. This is a hard tutorial. You will need patience and nail colors galore. For some designs, you may even need art skills, but not all of them require artistic talent. I realize I don't have a design for everyone's favorite characters, but maybe you can get inspired and create your own, or share it with me and I will try to create one for you.
I am in no way ambidextrous...so I was never able to do my right hand with complicated designs, if this is you as well...do what I do...fake nails. Fake nails are so much easier to do than your own, for one...you don't have to wait for each layer to dry before using your hands, potentially chipping or smudging them. The problem with fake nails is being able to hold them while painting. I solved it for you!

What you will need:
Nail polish/paint pens
Scotch tape
Nail file
Nail polish remover
For fake nail designs you will also need:
Fake nails
Nail glue
Toothpicks

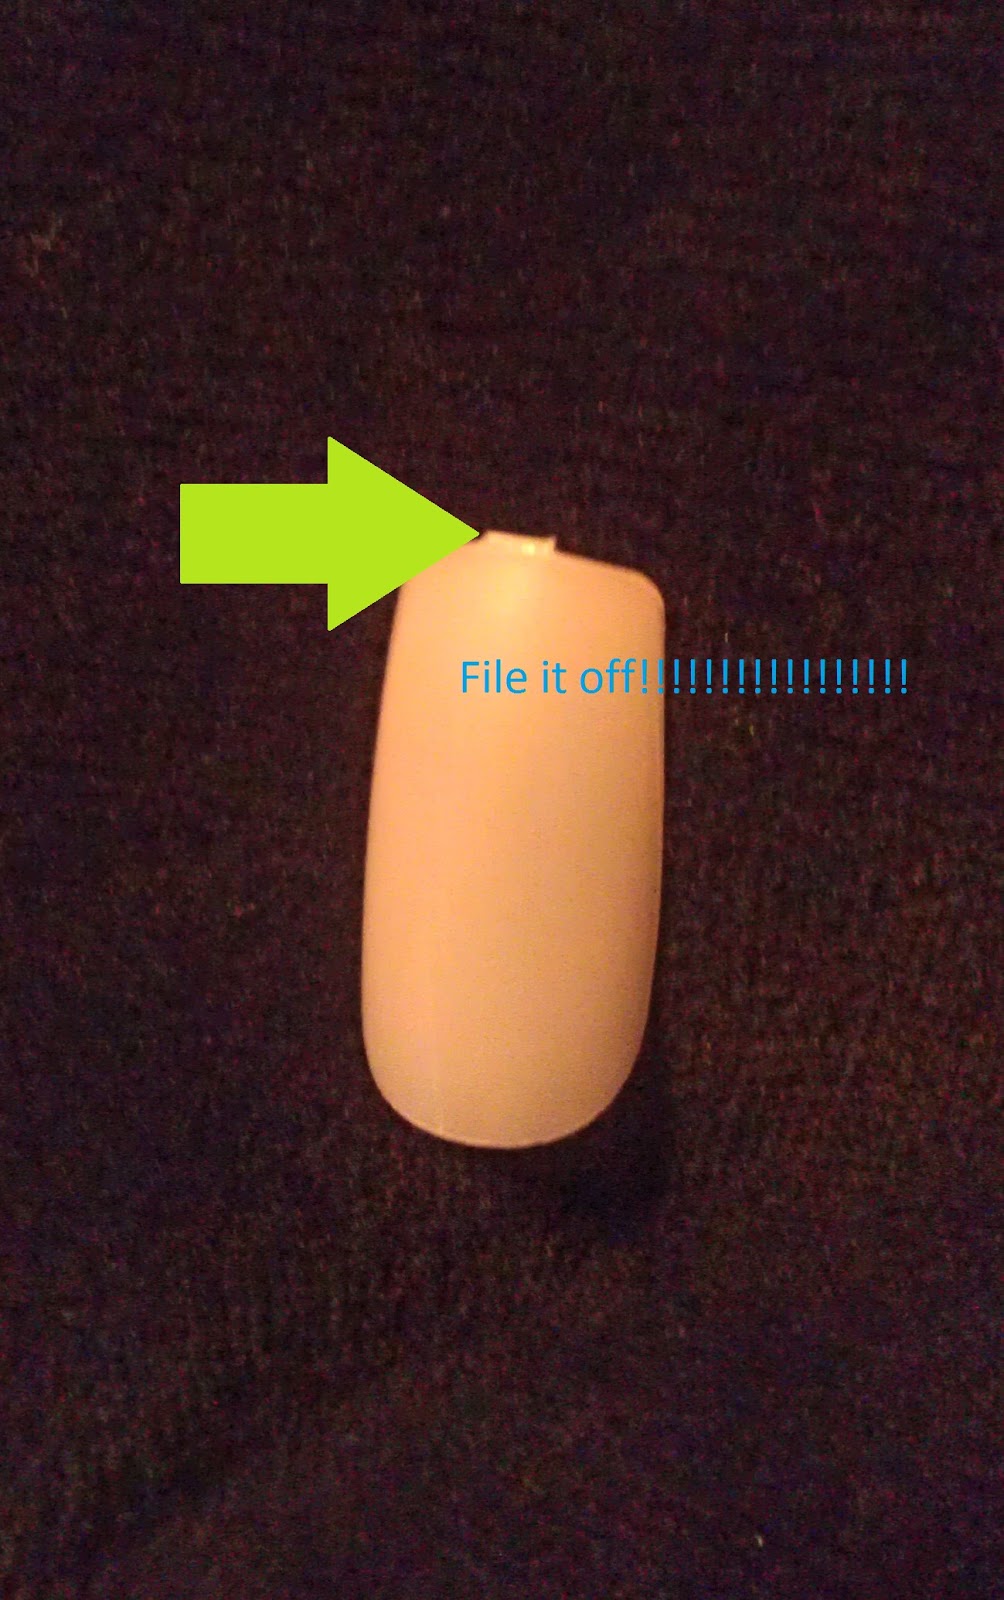
First step if you are using fake nails, pick the right sizes. If you use a nail that is too big it will rip off easily. Likewise if you use a smaller size than your nail, it will pop off. Next file off the little nub on the tip, you want to do this now so you don't have a chipped edge later...we do not want tacky edges!


Now to find a way to hold it, yet paint the entire nail...toothpick and tape. Roll a piece of tape so it is sticky on all sides, tape that to the end of a toothpick like so:

Make sure the nail won't come off while painting!
(Begin here if you're doing this on real nails!!!!!!!!!)
You're ready to put down a base coat of color on your nails. Let the base coat dry, you may need a second coat, if so, let that coat completely dry. I let the base coats dry over night to make sure they're not going to smudge on me.

The characters I am doing are Iron Man, Harley Quinn, Batgirl, Captain America, T'Challa & a vibranium nail, Hawkeye, Wolverine, Gambit's charged card, and Batman. I have designs for a LOT of characters, so it's really hard to choose which ones I want to do, once I find one that works I will sketch it out. If you'd like some ideas, feel free to take a gander at these babies:


Next you start designing. each layer of design needs to dry before the next so...more patience.
For Captain America's shield, start with a white base and a red tip, then cut a piece of tape into a shape like this: -^- as if it were half of a star and lay it over the bottom portion of the nail to mask the white you will be keeping. Also, you need to cut an arched piece to cover the tip for the red you will be keeping.Press these firmly to the nail surface so no polish gets underneath. It will look like this:
Now take some blue and cover in between the tape to create the blue shield portion. You may need two coats. When the polish gets tacky, peel the tape off fast for clean lines. Allow the designs to dry and apply a top coat.  BAM! 

Here are some designs from earlier this year:


These are sure to wow everyone who sees them. If you'd like a specific nail how-to let me know via the comments section...these are all really simple nails, and you can make them even simpler just by using a color scheme. Hulk could be neon green nails with purple shatter polish over them. Bat nails can be black nails with yellow tips. Also, I will be randomly selecting someone to choose a character and receive a set of themed nails from the comments below, if you're interested, simply comment below by January 31st with your favorite characters! Bye for now guys!